2014-05-01 16:56:09 Author:admin Source: Size of the characters:[big][middle][small]
Are you confused on how to paint beautiful animal paintings? The following are 15 tips about animal painting techniques and turorials, which were written by talented and experienced animal painting artists. Hope they can be helpful for you.
No.1: Moderate the use of photos Emily Lamb: “Paint and sketch from life wherever possible. And if you can, have sketches as ‘aids’ to photographs. If you’re using photos, make sure they are your own, or you’re allowed to borrow them. Stealing off the web just isn’t worth it!”
No.2: Composition is key David Shepherd: “The most technically accurate animals won’t make a good painting if the composition is off balance. My paintings tend to grow on the easel through a constant series of judgements, which involve positioning and repositioning the animals in relation to each other and their surroundings. For me, a wildlife painting succeeds when it conveys a sense of ‘being there’. It’s a yardstick that governs my choice of reference material and endures all the way through to the critical assessment of the finished picture.”
(Pictured Above: A Group of Animals, Geneva Painted by Edwin Henry Landseer in 1851)
No.3: Refine your sketches It is always tempting to skip straight to the painting stage but refining a drawing first can pay dividends later on. Begin by blocking in basic shapes, such as a triangular thigh or an oval head. Try to represent as much of the animal as possible in just a handful of shapes. Now choose a focal point, such as an eye, and measure vital points from this with your pencil. This stage will help you refine the proportions before progressing.
Next, refine the sketch itself, making sure the shapes of facial features and limbs are accurate. Check horizontal and vertical alignments too. With this framework in place, you can now begin to add paint or develop tonal layers with real confidence.
(Pictured Above: Sheep and a Lamb-Painted by Rosa Bonheur)
No.4: Plan your painting Kim Thompson: “When constructing a scene, many elements must be considered, especially if you are assembling several animals in one picture. I would recommend planning your painting on tracing paper first. I use a piece of paper the same size as the finished painting to establish the perspective and position of the main features, such as trees, clumps of bushes, water and areas of shadow. This forms the landscape onto which the animals can be arranged. Drawing all the animals onto tracing paper means they can be positioned and repositioned until you are happy with the composition. When you are half way through a painting, there is nothing more demoralising than realising that an animal is in the wrong place or the scale is incorrect. This process makes you really think about how the whole painting will look before you pick up a brush." (Animal Painting Techinques & Tutorials)
No.5: Keep Stocked Up Mandy Shepherd: “Overstock on the equipment that you carry with you. Time is not your friend when painting wildlife and you don’t have the luxury to run out of anything. Never be frightened to use any object to get the desired result either. In my paint box, I have inks, oils, pastels, rubbers, knives, sponges… even exdental equipment! You can’t be too precious.”
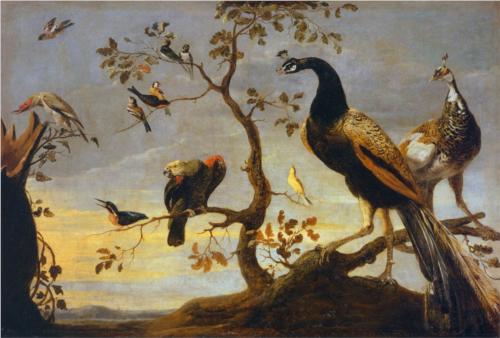
(Pictured Above: Group of Birds Perched on Branches- Painted by Frans Snyders in 1630)
No.6: Tempt your targets! Jonathan Pointer: “With the advent of digital photography, taking photos of birds is easier than it has ever been, even if you have a modest camera. Birds make great subjects and are easy to tempt close to windows with the use of a well sited bird table or peanut feeder, allowing the photographer to capture their bird subjects from the comfort of their home. Adding interesting branches or other natural props for the visiting birds to perch on will also offer extra possibilities.”
No.7: Be true to your subject Harriet Mead: “During selection for the annual exhibition of the Society of Wildlife Artists, we are looking out for artists that capture the essence of the animal and present it in a refreshing way. The subject does not have to be magnificent or pose
centre stage of the painting. Many wildlife experiences are fleeting glimpses that refl ect the shy nature of the subject. Choose a creature that you can spend time watching to see how it behaves and note its natural habitat. Well-observed studies of a relatively modest subject are often far more successful than laborious portraits.”
No.8: Go out on a limb! Getting limbs to look right can be one of the hardest part of wildlife art. Watch how a new subject moves. A bird’s ‘knee’ can appear back to front but you are probably just looking at a high ankle, with the knee closer to its chest. Bearing in mind how a limb behaves will add to the realism of a work.
No.9: Follow the herd Painting or drawing more than one animal together can add life to a composition. Observe how they interact – do they naturally act independently or huddle together? Sketch your subjects in a variety of poses and rearrange them until you are happy, being careful to keep them all in scale. Add unity by cooling colours of more distant subjects.
No.10: Work quickly Mandy Shepherd: “Always remember when drawing from life to try and get down the maximum amount of information in the shortest time possible. Always carry a sketchbook and use every ‘moment’ that catches your eye. This is such regular good practice to keep your eye in.”
No.11: Natural Habitats David Shepherd: “One of the essential elements in a good wildlife painting is atmosphere and you can’t get that from visiting the zoo or a safari park. Lions in zoos are fat and indolent, with unnaturally impeccable manes. In the wild, they’re leaner and fitter, their faces are scarred and their manes are usually damaged and often matted with mud. If you can’t observe animals in their natural habitat, the next best thing is to watch a wildlife programme on television. At least you’re seeing wildlife as it really is – albeit through a screen.”
No.12: Nature isn't just black and white Emily Lamb: “Don’t assume colour – look for it. Elephants are rarely ‘grey’ but appear so with a combination of colours. To brighten a painting, don’t just add white. Push the colour value instead and the painting will seem richer, whereas white often deadens it. I often paint in bad light so as to ‘push’ the colours on my palette, although I don’t suggest you paint your finished pieces like this. Try and refrain from using pure black too. My grandfather pointed out to me that nature is never black, it just seems that way.” (Animal Painting Techinques & Tutorials)
No.13: Use a Range of Brushes Pip McGarry:“Use as wide a range of brushes as possible; they are an important part of achieving the finish you want. For Panic In The Delta, below, I used a variety of flat hog bristle brushes for the initial layer of oil. I also used a ‘comber’ brush to help splay the zebra manes and for the water splashes I used a variety of rough and uneven old brushes to create a chaotic effect. A 0000 watercolour brush was used to touch up tiny details, like the eyes of the zebra.”
No.14: Find out how they move Hazel Mountford: “No animal is ever going to model for you, unless they’re a praying mantis, so having a good working knowledge of anatomy is an important tool for the wildlife artist. After studying your chosen subject and made lightening sketches, a fi tting and visually pleasing pose can be created. Using good anatomical diagrams, which are available in books and online, the drawing can then be reworked with reference to the skeleton and then the muscles. Viewers may know nothing about anatomy but they will instinctively know when an animal looks ‘wrong’. Changes may have to be made to your chosen pose but it is a satisfying journey and you will certainly end up with better results.”
No.15: Decide on how to tackle fur There are two main options you can consider when setting about painting fur: be suggestive or embrace detail. If you are working in watercolour or aiming for a more impressionistic style, suggesting the detail works well. Use dabs of colour to suggest the texture and avoid the urge to paint in every whisker. For real detail, especially in oils or acrylics, try establishing a general, darker tone under the fur first, before building up layers of hairs in varying colours. Make sure your brushstrokes follow the direction of fur growth for added accuracy. If you get the tonal values correct, overall colours can then be tweaked with glazes of colour.
Edited by Kevin from Xiamen Romandy Art Limited. Founded in 2001, Xiamen Romandy Art Co., Ltd. is one of the leading oil painting galleries engaged in the production of handmade oil paintings in China. Our high quality products and excellence in service have helped us to enjoy a high reputation among our clients. Look forward to hearing your kind inquiries.